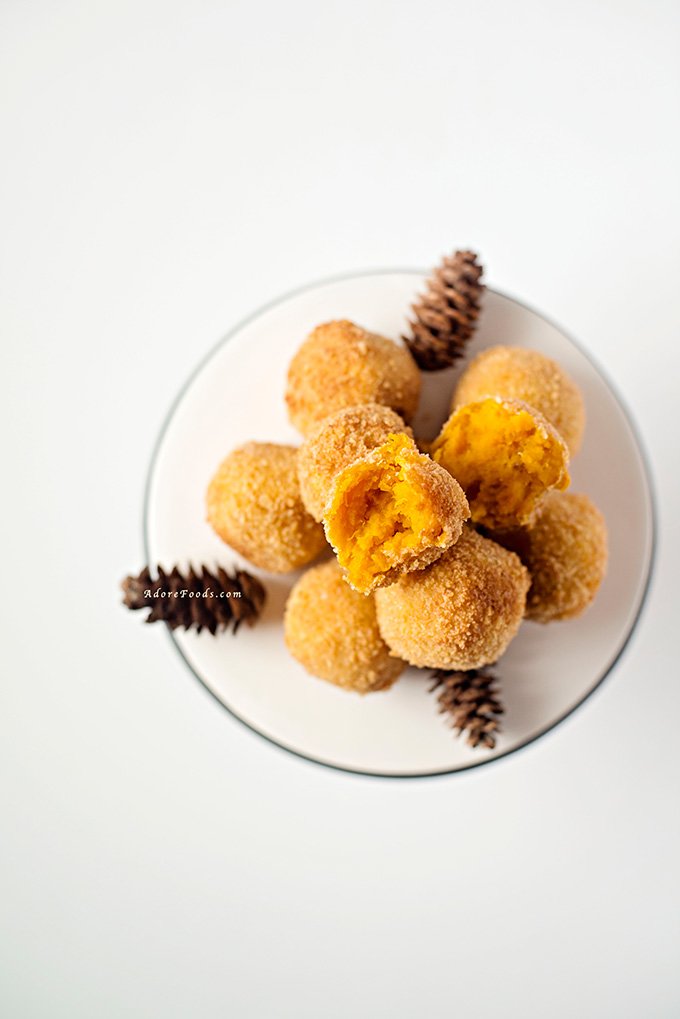
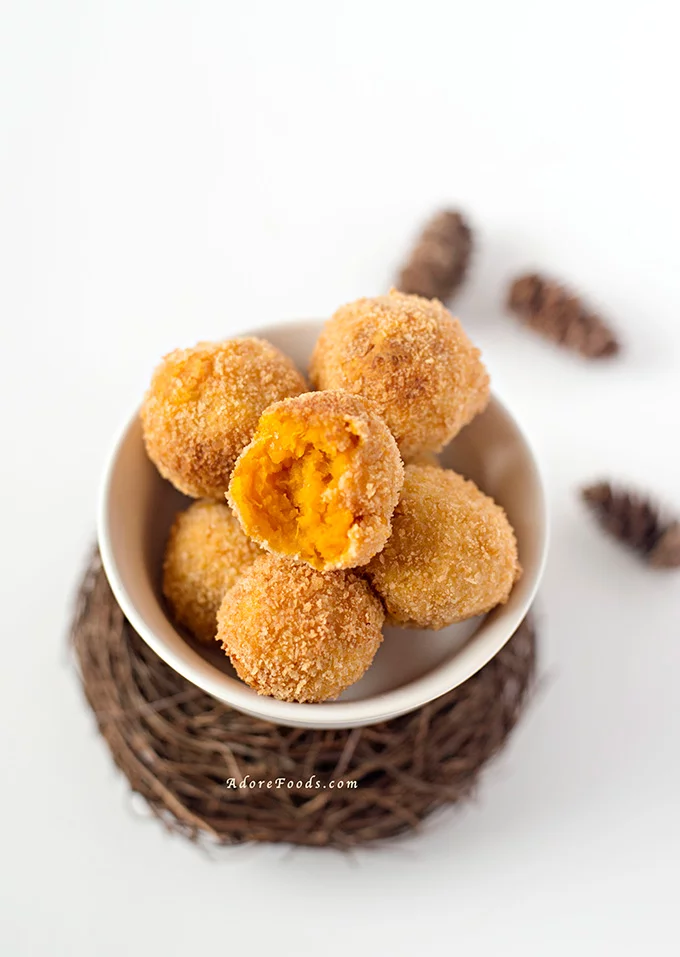
Crispy yet creamy, these Japanese Pumpkin Croquettes are just perfect fall appetizers!


Prior moving to US, I had absolutely no idea how many types of pumpkin are out there. I am becoming a pumpkin freak, I am telling you! My husband has already had enough of my pumpkin recipes and is really looking forward to having something else. Little does he know that November is going to be Thanksgiving month and of course, there will be some more pumpkin/ squash recipes around…hehe 🙂
Fall is synonymous with everything pumpkin! More savory butternut squash dishes not to miss include oven baked chicken thighs with butternut squash, easy butternut squash gratin, butternut squash apple and sweet potato bake, or creamy pumpkin mac and cheese!
I have really enjoyed exploring so many diverse pumpkin recipes this month. Don’t go yet, I still have 2 more killer recipes to share with you this week.
Today we are having fried yummy treats. Japanese pumpkin croquettes – Kabocha Korokke


Crunchy, vibrant looking small pumpkin fried balls.
Kabocha are Japanese winter squashes with a dark green outer skin and orange flesh inside. Its color is very similar to butternut squash, but the difference stays in how dense is the flesh and also in taste too. It is sweeter than other types of squash.
I am loving the amazing crispy outer crust and moist, sweet pumpkin filling. It is beyond delicious!


They are just great as appetizers, snacks or party food. Well, for me, they were good enough for breakfast 🙂 Guaranteed you will not be able to stop snacking on these.

Japanese Pumpkin Croquettes (Kabocha Korokke)

Ingredients
- 1 Japanese kabocha, washed and cut in thick slices
- 1 small onion, chopped
- 1 tablespoon milk, 2%
- 1 large egg
- 2-3 cups panko bread crumbs
- ¼ cup flour
- olive oil
- salt and pepper
Instructions
- Preheat oven to 400F/ 220C.
- Wash kabocha squash, cut in half, remove all seeds, and cut into thick slices.
- In a large bowl, place squash slices and drizzle some olive oil and gently mix to coat them. Add some salt and pepper.
- Line a large baking tray with some parchment paper and add kabocha wedges. Bake for 45 minutes or until tender.
- Meanwhile, chop the onion and sauté in some olive oil until golden. Set aside and allow to cool down.
- Remove kabocha wedges from the oven and gentry spoon cooked squash into a bowl, separating it from the skin. Add sautéed onions and mx to incorporate them well. Season with salt and pepper and add 1 tablespoon of milk to better incorporate and get a creamy mash mixture. Allow to cool down completely before starting to form the balls.
- You will need 3 different bowls for finishing up the balls: one with flour, one with one beaten egg and the third one with panko breadcrumbs.
- Form small balls, almost 1 inch/ 2.5 cm and dip kabocha balls first in flour, next in the egg mixture and then coat with panko breadcrumbs.
- Heat olive oil/ vegetable oil for frying in a medium pan till hot and start frying about 6-10 kabocha balls at a time, depending on how large your pan is for about 1 to 2 minutes on each side until golden brown.
- Place the fried balls on a plate lined with some paper towels and allow to cool before diving in.
- Enjoy!
Nutrition Information:
Yield:
25Serving Size:
1 gramsAmount Per Serving: Unsaturated Fat: 0g
William
Sunday 17th of June 2018
Been struggling with the pumpkin which comes out too moist out the oven. The mix is almost watery shift doesn’t allow to make balls. I’ve pan fried the mix to lose the water content but would like to avoi the extra step.
Adore Foods
Sunday 17th of June 2018
Hi William, what kind of pumpkin are you using? Kabocha pumpkin usually is so dense when it comes out of the oven and that's why I was adding 1 tablespoon of milk to the recipe. Are you allowing the mixture to completely cool down (you may need to put it in the fridge a bit) before rolling the balls? The pumpkin type and cooling down step are really important when it comes to this recipe
ramblingtart
Thursday 29th of October 2015
These are so cute and vibrant! :-)