

Introduction: Evenstar Arwen Necklace - LoTR
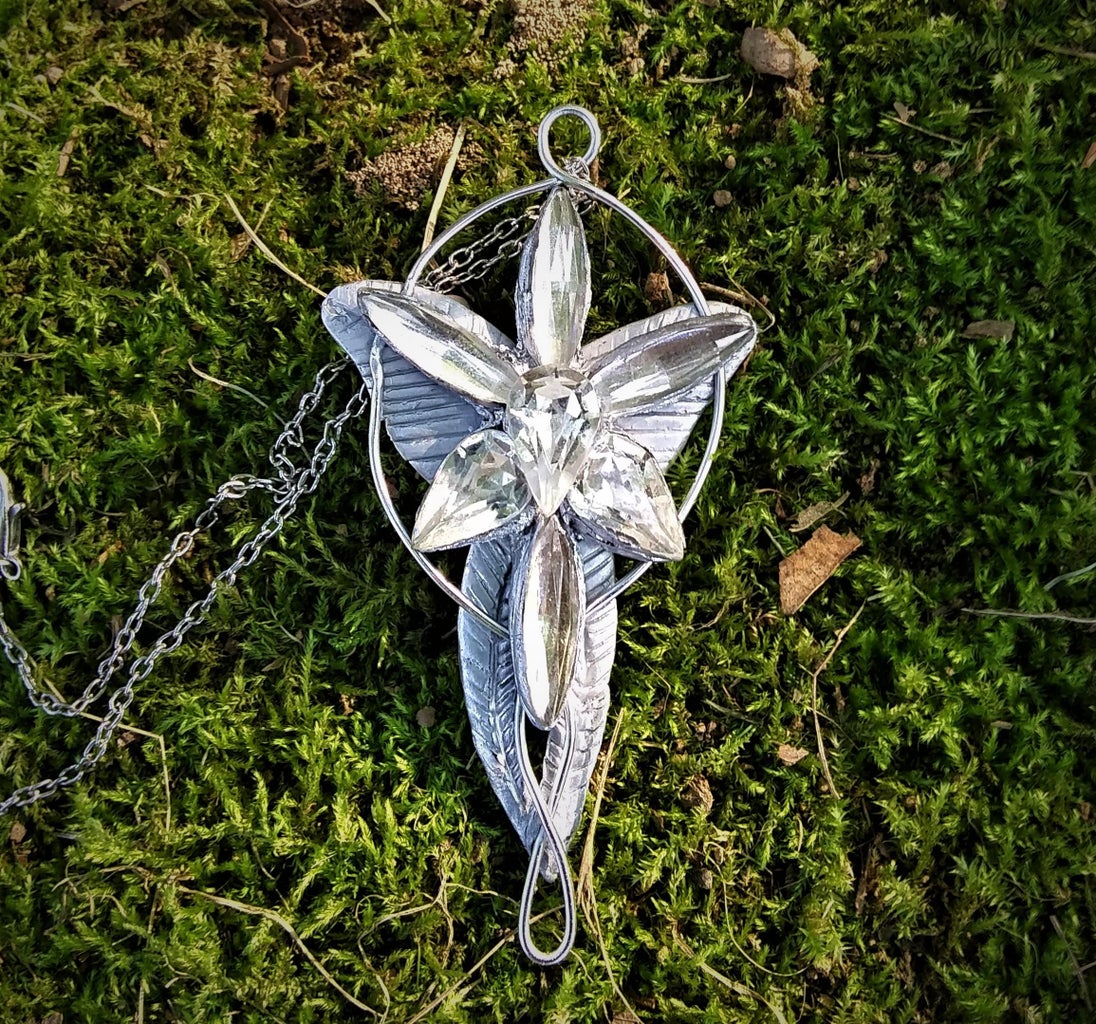


This is probably the most sought after piece of Lord of the Rings jewelry (besides the One Ring, of course). When I watched the movies, they came with a little brochure all about how you could go online and order replica pieces, and that was the piece I wanted. I remember specifically that I wanted a set that came with earrings and a necklace, even though I didn't even have my ears pierced at the time. I just knew that I would look like an elven princess while wearing them.
This is something that I have debated making for a long time but have never done. It always felt very intimidating. I saw someone else's tutorial on one a while back. Theirs was pretty, but they had changed the design. While I looked at the tutorial I thought, "That isn't what it looks like, is it?" So I looked up photos from the movie, and no, it wasn't.
As I was looking at the photos I thought, "You know, why am I waiting to try this?"
So I'm gonna try.
Supplies
1. Clay
( you can use air dry or polymer clay, it is your choice. My clay is in grey because I am going to paint it after sculpting, but you can use a metallic clay if you like.)
2. Sculpting tools ( roller, stylus tool, knife tool - if you do not have specific clay tools you can use anything that will roll and flatten clay for your roller, a toothpick or such for the stylus tool, and a regular plastic knife or an old credit card for the knife tool.)
3. Workspace
4. Rhinestones.
You need three pear shaped rhinestones and four navette shaped rhinestones. Mine are glass, but you can use acrylic if you like. The size of mine are Pear: 7 X 12mm Navette: 5 X 13mm
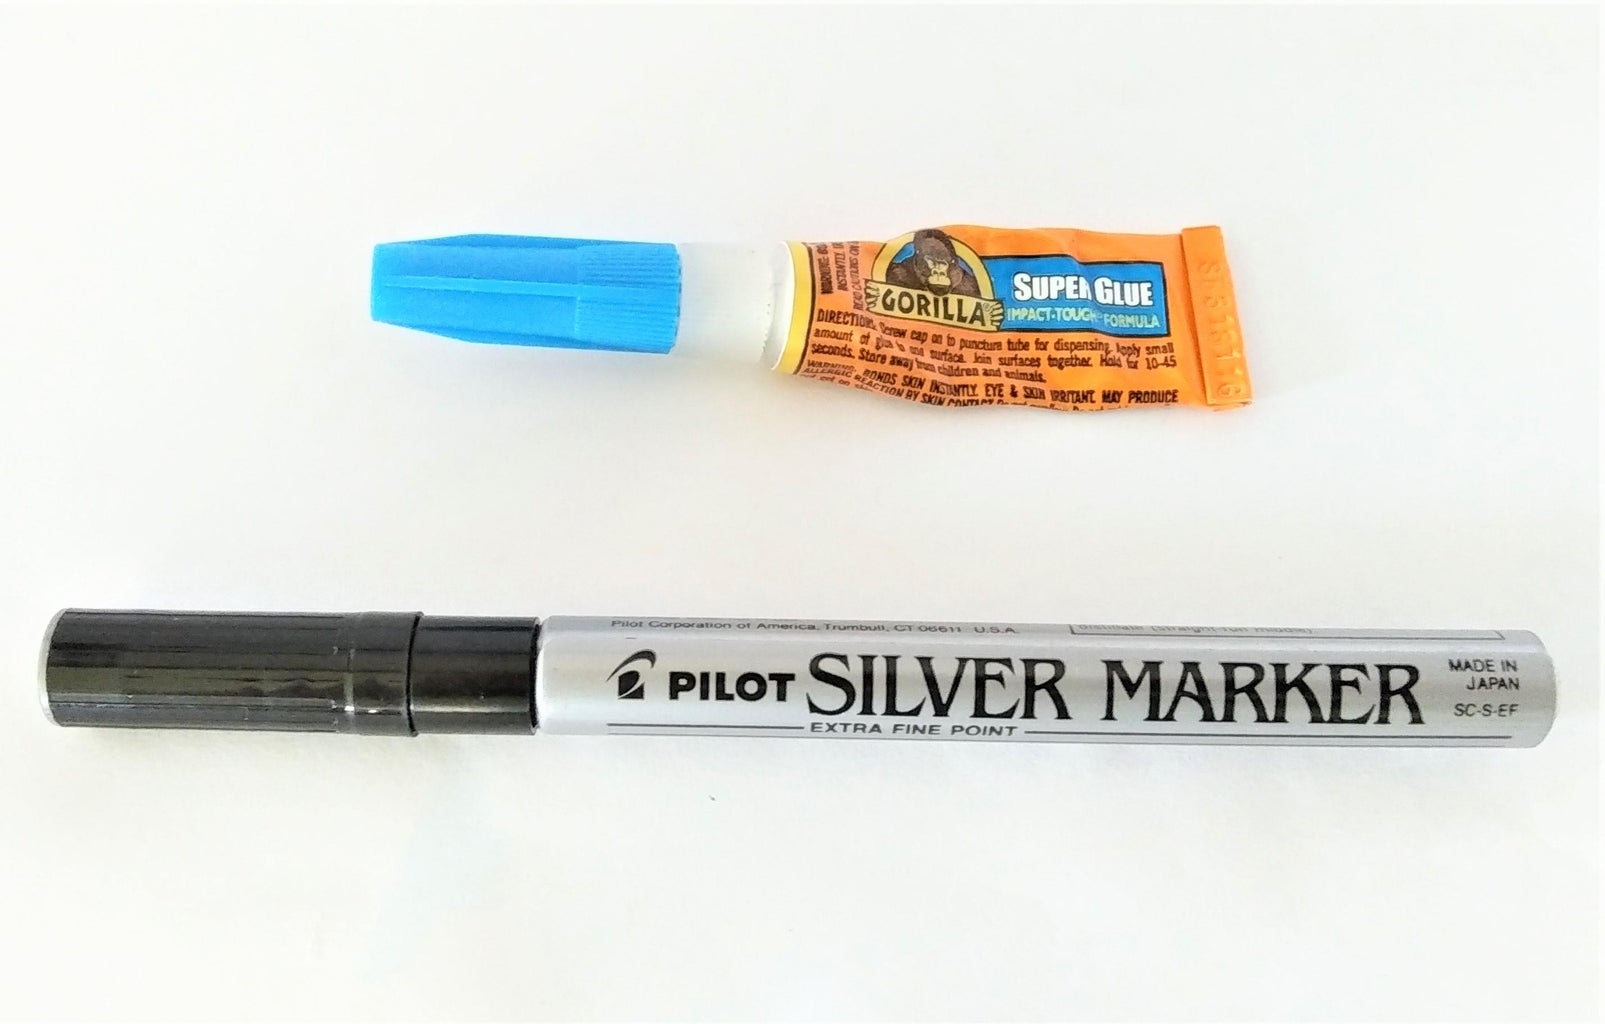
5. A strong glue. I am using a Gorilla super glue.
6. Any of the following to give it a silver look : Metallic clay (see above), metallic paint, metallic powder (nail powder, Pearl Ex, etc.), silver leafing, or anything else you can think of that would give the clay a silver appearance. I am using a metallic paint pen.
7. Silver Aluminum wire in 16 gauge (this is kinda a personal preference thing - this is what I had and what I thought looked best with the size of my other components).
8. Wire cutters
9. Varnish and brush to apply (optional)
Step 1: Assembling the Center Rhinestones


I have no idea what was used in the movie prop. If it is anything like any other movie props, they probably had several; some good materials and others bad materials that just had to sit there and shine during scenes that it wasn't central.
Which is practically all of them.
Any way, I went with glass rhinestones. This was the hardest part of the whole project. I searched for rhinestones that I could rob off of other jewelry or clothing, but it just wasn't happening. I finally had to give in and search online.
Then I ran into another problem. The navette rhinestone shape that is on the pendant in the movie is hard to find. I'm not saying you can't find navette rhinestones, but you mainly find the fat little ones. To find a tall, skinny shaped navette is extremely hard.
Finally I ordered the rhinestones off of ebay. I got both my navette and my pear rhinestones from this guy's shop: Richards Rhinestones. This was my biggest expense on the project because I wanted the shine of glass, and the rhinestones I received are glass.
Anyway, on to the project.
Looking at photos from the movie and photos of very expensive pieces you can order offline, I understood the basic shape. Roll out your clay to a semi-thin sheet. You want to be able to press the rhinestones into the clay.
Starting with the top navette stone, press it down into the clay. Do the right or left "shoulder" navette, making sure it is at an angle.
*If you are using air dry clay, put a little bit of super glue on the back of the rhinestones before pressing them into the clay.
Place the bottom two pear shaped rhinestones at a downward angle that mirrors the angle of the top two navettes. I like to hold my center pear rhinestone over the piece just to check that it looks how it should.
The final rhinestone to go in place is the bottom rhinestone pointing straight down.
Take the knife tool and cut around the pieces that are stuck in the clay. Try to cut as close as possible. Use the stylus tool or the knife to smooth the cut edges so they aren't raggedy.
If you are working with polymer clay, you might want to bake the piece once you have gotten the piece trimmed out. I would advise reading this piece by The Blue Bottle Tree author, Ginger Davis, where she explains about baking clay with rhinestones. The basic jist is, if it is glass, you're fine to bake, if plastic, don't bake.
After baking, add a little dot of clay in the center of the rhinestones where they all meet. This is where the middle piece will sit. It is kinda a fine line of not too much but not too little clay. Press the last pear shaped rhinestone into the clay, making sure the point is downward. Once again, smooth the clay with a tool.
Bake the piece. After baking, you might want to take a pair of tweezers or a small knife and pop the rhinestones back out, put glue in their "settings" and glue them to the baked polymer clay. This will provide a more secure hold.
For air dry clay, set the piece aside and proceed to the next step.
Step 2: Wings or Leaves?


I know these are probably supposed to be leaves, but they kinda make me think of wings. Any way.
I drew up a pattern for this if you don't want to free hand this piece. Simply print out the pattern, trim around the pieces with scissors, roll out the clay, lay the patterns on your clay (don't press on it), and trim around the piece of paper. That is the simplest route. If your piece is not the same size as mine, you can resize the image in your program.
The other route is to look at photos and place your center shiny piece on your clay and "draw" the pieces the size to fit the center by using a stylus tool or toothpick.
Whatever way you do it, you will cut out two curved leaf pieces that are mirror opposites of one another. They should have a small curved point at the end of the fat part and then should become very skinny at the ends.
Flatten the sides of the pieces with your finger by pressing on the very edge of the clay. You may find you need to trim the pieces as you work if they become too distorted.
With the stylus tool, draw a line from the point at the top all the way down to the bottom. Next, taking the knife tool and press it lightly into the clay to create the leaf's veins. They should slope diagonally upward from the center line on both sides. Do this the whole way down the leaf.
I did the back sides of the leaves in the same pattern. I don't know if that is "accurate" or not because as far as I remember there is no time in the film when you see the back side of the piece. Commercial pieces show the reverse of the other side as the design on the back, but I decided to just make it the same as the front.
I did one leaf at a time.
Lay one leaf over top of the other, crossing them in the middle. All the commercial ones had the left wing on top of the right wing, but I don't think it is that important. I press down on mine a bit to make sure they stay. Then bend the ends toward each other, making them meet at the very bottom. Make sure to leave an empty loop between the two pieces. Press the two ends together.
Attachments

Step 3: Painting


If you are going to cover the clay with something to make it resemble silver more, now is the time. I am using a paint marker, but you can use whatever you want. If you are using polymer clay, make sure it is a compatible product (DON'T USE NAIL POLISH!!).
I make sure to coat all of the leaves and all the of the clay showing around the rhinestones. I painted the back of the rhinestone piece as well, skipping the middle section because it won't show in the finished project.
Once my "silver" was dry, I added a gloss polyurethane varnish on top for just an extra shine. You don't have to do this if you are working with polymer clay. Air dry clay will need to be sealed. I recommend Duraclear Polyurethane Varnish - it is what I use all the time and I have not had any problems with the gloss, satin, or ultra matte.
After the varnish is dry, move on to the next step.
Step 4: Wire


Next up is the aluminum wire.
Uncoil a bit of the aluminum wire from the spool. Cut it off at about 8 inches or so (you want to have enough that you don't have to worry about running out.) Start at the bottom where the clay pieces meet. The wire on the pendant extends past where the clay is by about half an inch or 1 1/2 cm (well, that's my guess). Carefully bend the wire in the middle and make a small curve that mimics the curve of the clay above it.
Now, where the clay make a loop, make a wire loop on top of it. It shouldn't be as big as the clay loop. Place your rhinestone center over top the piece to check that the top of the wire loop just touches the bottom rhinestone tip.
Now the wires will split away from each other and make a large loop over top of the wings. The edges of this loop should just touch the points of the pear rhinestones and then go under the angled navette rhinestones. It should just be a smooth curve.
I like to check my progress by placing my rhinestone piece over top of the wings and wire so I can make sure I am bending the wire where I should.
Once the wires are bent in the correct curve, mark where one of the navette rhinestones covers the wire. Trim the wire to that exact spot. This way the cut wire can be hidden and it will look like a seamless loop.
At the top of the pendant, where the top navette is, twist the long wire into a small loop. This is what will hang the necklace.
Bend the wire away from the loop down toward the trimmed wire to match the other side. Cut the long wire at the same spot so that the diagonal navette will hide both trimmed ends.
P.S: Don't mangle your wire like I did trying to somehow meld the two pieces together. Just set them on the clay - the glue we will use will hold it down.
Check the whole picture by placing the rhinestone top on the base and the wire.
Step 5: Finishing Up


Taking the rhinestone piece, I apply glue to all the major sections that will touch the base (only the very bottom of the top piece will touch the base, so don't put unnecessary glue on the back of the top rhinestone ). Then I line it up and place it on the base over top of the wire. The top two navettes should be on top of the wire, and the wire should be practically touching the points of the diagonal pear rhinestones. Make sure you put glue where the rhinestones, wire, and clay all meet.
Once the glue is dry, the pendant is finished. String it on a chain and you are ready to be an elf.
Step 6: Evenstar Undomiel


I hope you enjoy your own Arwen pendant. I will warn that this is costume jewelry and probably would not stand up to regular wear and tear if you wore it daily. Save it for special occasions so you can shine with your true beauty for all to see! Let it remind you of hope in dark days.
Though I like this piece, it is just a movie prop. Peter Jackson made it up. It is not in the book. As a sign of her love, Arwen actually presented Aragorn with a brooch that had been passed down through her mother's family. I plan on doing an Instructable on this piece, too, when I finally get around to it. In the meantime, I will chart this down as my first piece of Lord of the Rings jewelry and look forward to more to come.
For many more adventures,
Little Lightning Bug.

Participated in the
Fandom Contest


