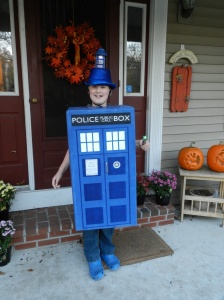
 It’s Halloween 2013 and my 10 year old Michael has discovered “Dr. Who”. He’s a HUGE fan, and like many Dr. Who fans, or should I say Whovians , he is obsessed. He finds the alien, double-hearted, time and space traveling Englishman wonderfully interesting. Not too surprising, he asked if he could be dressed for Halloween this year as a Dalek. What in the world is a Dalek? My thoughts exactly since as much of a fan as Michael is, I am a disinterested bystander. I hear endless recounting of plot lines and characters, but really, it’s just not my thing. So here is what a Dalek looks like.
 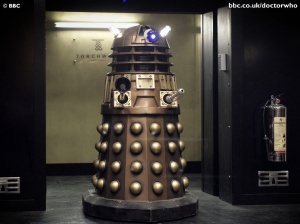 Yeah, I said “no”. I’m as adventurous as the next costume maker, but was not about to tackle something so oddly shaped and detailed, nor was I willing to send him out on a dark night in a costume that covers his whole head. So, on to Plan B. He asked if I could make him a Tardis costume. This is a Tardis…
  That at dapper fellow next to the Tardis is The Doctor (and don’t you ever call him “Dr. Who” for his name is “The Doctor”). This, box shaped item with lots of squares, seemed much more doable to me. At first, he wanted me to make it so that he was inside the tardis and could open the doors to reveal him, dressed as The Doctor inside. In addition to the technical challenge this presented, it also left him without a 360 degree view of the world around him, so we compromised. He would be just the tardis, with his head sticking out the top and the light would be on top of his head.
So now, my pal Wendy had just received a patio heater in the mail and had this awesome, perfectly proportioned box for me to use. Nice! For paint, I used regular interior house paint. which I purchased in the handy “sample” size from both Home Depot and Lowe’s. 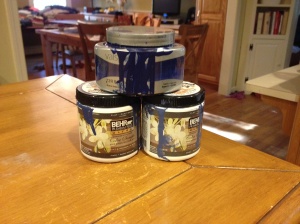 The black and white paints I already owned in regular craft paint, so I used those where needed. I painted the entire box before I did any cutting for the head and armholes. I started with the base blue color and after letting that completely dry (I used an old hairdryer to speed up this process), I started adding all the details. For all of these, I used painter’s tape. I highly recommend this technique, as I cannot imagine getting the nice sharp lines painting all of those squares, rectangles and stripes by hand. Here’s a couple of pictures of the box at different phases of the process. I apologize that the first pic is pretty crappy.
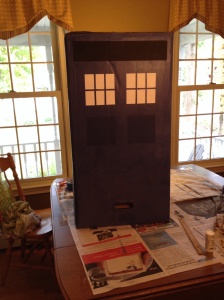
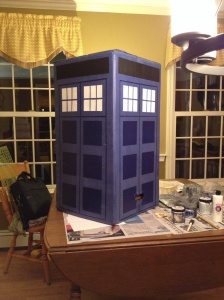 In case you’re interested, I did the black strip first, then the white windows, then the deep blue squares and finally, I did all of the pinstriping. Also, I worked on all four sides at the same time, so that I could remember all of the measurements for each section easier. In other words, I painted the black box on each of the 4 sides, one after the other before I moved onto the windows which I did on each of the four sides before I moved on to the blue squares, and so on. With the painting all set, I was free to start adding all of the details. I found the “Police Box” writing by Googling it, (you can find it here) printed it out, then enlarged it to scale for the box. I literally just cut out the strip of letters, then glued it onto the box. I couldn’t be bothered to cut out each letter individually, and it was almost completely unnoticeable on the black background. Check it out…
 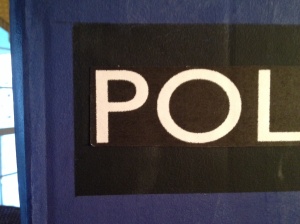 Next, I printed out the notice and the emblem, sized them and glued them in place. You can find the links here – Notice, Emblem. For the handle, I just bought a simple, small cabinet handle and literally screwed it through the side of the box. I used washers at the back to give it a little more stability and to make it harder to pull through. After I cut out the head-hole (centered on top), I had the hardest time deciding where to put the arm holes. I wanted to give Michael the most freedom of movement, but wasn’t sure if that would be accomplished with holes at the shoulders or down by the elbows. I ended up putting them down at elbow height, and while he can’t touch his head, or put his hands together in front of him, it turned out to be the most comfortable for him. In case you’re wondering, I used a serrated steak knife to do the cutting. Don’t tell my husband, because he loves his steak knives at least as much as he loves me.
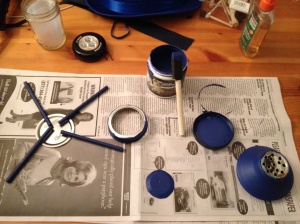
For the hat/light, I used a combination of things that I had laying around my house. Here they are all gathered together… 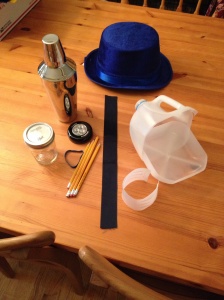 I should clarify that the royal blue top hat was NOT lying around my house, I bought it at the party store. The other items I used were a length of 2″ wide blue ribbon, four pencils, a blue elastic (from some asparagus I got at the grocery store), a small mason jar, one of those battery powered “push lights”, and (seriously) a martini shaker that we got as a wedding gift 12 years ago and have never once used. In the picture, you will also see a cut up milk jug, but I ended up not needing it , so just ignore it. So take the mason jar cover and remove the flat plate from the inside of it. Weave the ribbon through it so that it goes in one side of the cover and comes out the other side. check out the picture so that you can see what I mean.
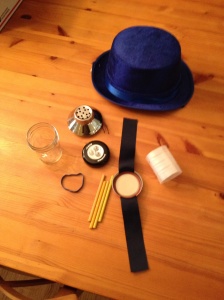
After I took this picture, I realized that if I had two lengths, and crossed them like a plus sign, and did the same thing, that it would provide more stability. You’ll be able to see this in the end photo. In the above picture, you will also see that I cut my pencils to be the height of my mason jar plus a half inch. I did this with my little hobby sized miter box. I also disassembled the martini shaker and only used the cover. The white thing to the right in the photo is the milk jug piece that I ended up not using.
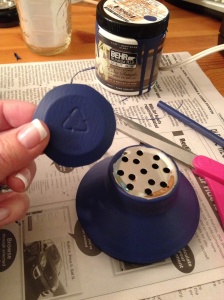
Now you need to paint the jar cover (just the sides of the cover, only on the outside), the pencils and the martini shaker cover.
I cut out the bottom of a Solo cup (a plastic “keg” cup), and painted it the same color. This will be used to cover the holes in the martini strainer top.
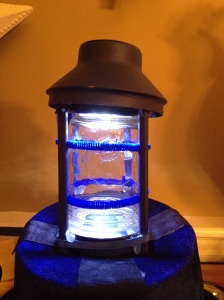
Now is when it gets put together. You will want to plug in your hot glue gun now, because it’s put together with lots of hot glue. Take your mason jar cover, with the ribbon woven through the top, screw it onto the mason jar then invert it and center it on the top of your hat. Glue the cover and the ribbons to the top of the hat. Use plenty of glue because this is what will make your hat and your light into one solid unit. Next glue your pencils to the jar cover, spacing them out evenly at the four “corners” of the jar. Once the glue dries, put your blue rubber band over the pencils at the same spot you just glued. This will give them a little more stability. Now, invert your push light and put it on top of the mason jar’s bottom (when it’s on it should shine down into the jar). If you haven’t already, glue the little plastic top to the martini shaker strainer top. Now carefully squeezing the pencils together, place your cover onto the light. It will sit on top of the underside of the light and catch the pencil ends in the edges. When it’s time to turn on your light, just remove the cover to do so, then replace it. I’m planning on hot gluing the cover in place for trick or treating, because my son will be running like a sugar-loaded maniac (which he will be by that time). If you decide to do this, wait until it’s “showtime” because there will be no way to access the light once it is glued.
I decided after the fact to add some horizontal “bars” to my light. I did this with blue pipe cleaners and just (say it with me) hot glued them in place. Here is a closeup of the final hat/light assembly…
I just realized that the cover is on a little crooked, but it DOES fit on there straight, I promise you.
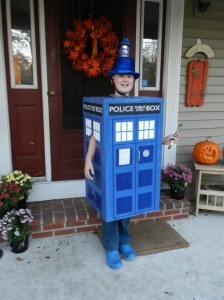
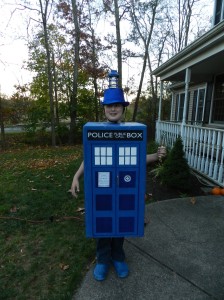
And that is the whole thing. He wore it to a party last Saturday and these pictures were taken on my porch before we left.
That thing in his hand is called a “Sonic Screwdriver”. It’s the Doctor’s tool and I bought it at Newbury Comics. On Halloween night, he’ll be wearing a navy long sleeved tee, which I think will make the costume look even better.
I think that’ll just about do it. Hope you enjoyed the tutorial and good luck making your own Tardis costume!
You continually out-do yourself!
Very cool!
Very cool! I love how you did the light! I had so much trouble finding the right box – that I ended up settling for a box that was a bit too square, but it worked out. Some pics: http://bit.ly/drWhoTardis Have a happy Halloween
I love Doctor Who !!!!!!!
Pingback: Rejoicing in Our Differences: - Jan S. Gephardt's Artdog Studio
Pingback: Rejoicing in Our Differences: - Weird Sisters Publishing
Do you mind sharing your measurements? Thanks
Truthfully I’m not sure what the measurements of the box were – I just “eyeballed” it looking for something that was big enough for him to get into and longer than it was wide. Good luck!